
Picking
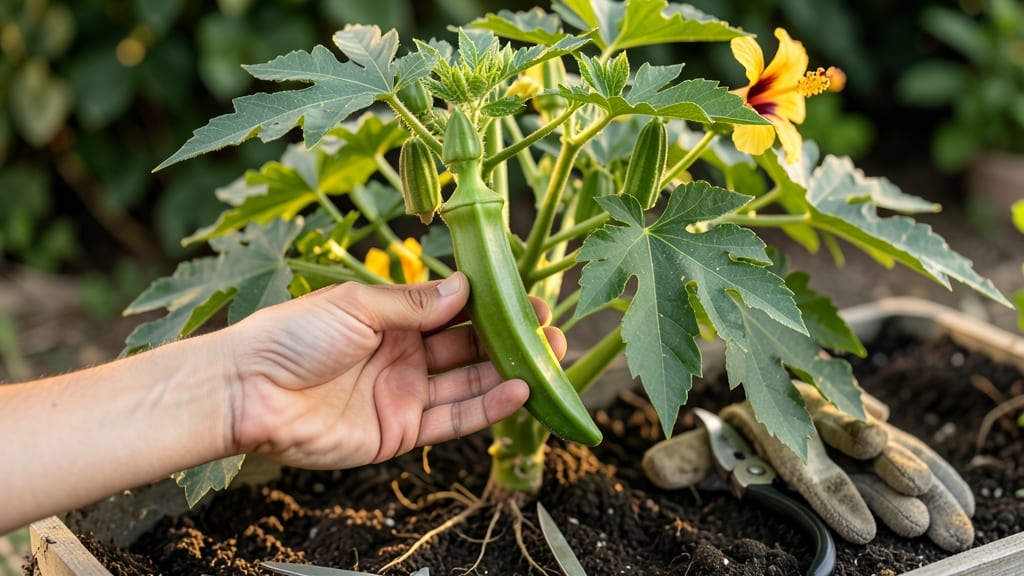
To pick okra from the garden at its peak tenderness, check for pods that are 2–3 inches long—any longer and they turn woody and bitter.
Harvesting okra at the right time transforms its tough, fibrous texture into a delicately tender vegetable—here’s how to master the finger-length trick for perfect okra every time. 🌱
Most gardeners wait until pods snap easily at the stem (a sure sign of readiness), but timing matters even more when you want that just-picked freshness. Skipping this window means tough, stringy pods that no recipe can save.
Below, I’ll break down the exact visual cues to watch for, how often to harvest for continuous production, and the best times of day to avoid wilting or pests.
The perfect okra size: finger-length guide for harvesting
Okra thrives when harvested at the right size and maturity. The ideal finger-length for picking is between 2–3 inches, where the pods balance tenderness and flavor. This window ensures you avoid the woody texture of overripe okra while still enjoying the full nutritional benefits.
Think of it like trimming your toe nails—too short, and it’s bland; too long, and it’s tough!
Timing your harvest correctly isn’t just about size—it’s also about visual cues and physical texture. A perfectly ripe okra pod should feel firm but tender when gently squeezed, with a deep green color and a slight fuzzy texture.
These signs indicate peak flavor and texture, making all the difference in your cooking. Miss this window, and you’ll end up with pods that are either underdeveloped or bitter.
Here’s why the 2–3 inch rule works so well: pods grow rapidly, and their cell structure hardens after just a few extra days. The earlier you pick, the more tender the okra, but pods under 2 inches may lack the full nutritional profile and robust flavor.
Aim for consistency—check your plants every 2–3 days during peak production to stay on top of the harvest window.
| Pod Length | Color | Texture | Flavor | Harvest Action |
|---|---|---|---|---|
| Under 2 inches | Pale green | Very soft | Bland | Wait 1-2 days |
| 2–3 inches | Deep green | Firm & tender | Sweet & crisp | Harvest immediately! |
| Over 3 inches | Dull green | Woody & fibrous | Bitter | Use in soups/stews |
One of the best tricks I’ve learned is to harvest in the morning when pods are cool and hydrated. This is when they’re at their firmest and most flavorful.
Use a sharp pair of pruning shears or a knife to cut pods just above the stem—this minimizes damage to the plant and encourages more production. Avoid tugging, as this can tear the plant and leave it vulnerable to pests and disease.
The color of okra pods is another key indicator. Look for a vibrant deep green, not pale or yellowing. A dull or mottled color can signal overripeness or stress, often due to inconsistent watering or extreme heat.
If you notice pods with white or brown spots, they may have been exposed to too much sun or are developing fungal issues. In this case, harvest immediately or remove them to protect the rest of the plant.
Don’t overlook the stem separation test—a pro move for experienced gardeners. Gently twist a pod between your fingers. If it snaps cleanly from the stem, it’s ready to pick. If it resists or pulls away with the stem, it’s not quite there yet.
This method works especially well for larger varieties like 'Clemson Spineless', which can grow pods up to 6 inches long if left unchecked. The earlier you catch them, the better!
Regional differences can also affect okra maturity timing. In hotter climates like the South, okra grows faster due to longer daylight hours and higher temperatures. You might see pods reach harvest size in just 50–55 days, while cooler northern gardens may take closer to 60–70 days.
Pay attention to your local last frost date and adjust your planting schedule to ensure you’re harvesting during the peak summer months when your plants are most productive.
Pro tip: Label your okra varieties if you’re growing multiple types. Some, like 'Emerald' or 'Burgundy', produce pods that stay tender longer, while others, like 'Arkansas Traveler', can become fibrous quickly.
Keeping track of each variety’s growth rate and harvest window helps you stay organized and ensures you’re always picking at the perfect time for each type. A simple garden journal can save you from missing the window on your fastest growers!
Remember, the more consistently you harvest, the more your okra plant will produce. Think of it like pruning a bush—the more you encourage growth, the bushier and more productive it becomes.
With the right finger-length guide and attention to detail, you’ll enjoy a steady supply of tender, flavorful okra all season long. Happy harvesting!
Signs okra is overripe or underripe: what to watch for
Okra’s flavor and texture change dramatically based on harvest timing. Picking too early gives you bland, underdeveloped pods, while waiting too long turns them woody and bitter. As a gardener, I’ve learned the hard way—overripe okra can ruin even the best dishes!
The key is knowing the visual cues that signal when your okra is at its peak or past it.
Start by checking the pod length. Ideal okra should be between 2–3 inches long. Anything shorter is underripe, while pods over 4 inches become tough and fibrous. Color also matters—deep green pods are perfect, while yellowing or brown spots mean it’s overripe.
Pay attention to the stem attachment too; pods that snap easily from the stem are ready, but those that resist are past their prime.
⚠️ When to Pick Okra: The Critical Window
Harvest okra every 2–3 days to prevent overripening. Use this finger-length rule: If your index finger fits inside the pod, it’s ready! Wait longer, and you’ll deal with bitter, fibrous pods that even stews can’t salvage. Morning harvests are best—cool temps help preserve freshness until you cook.
Underripe okra often feels soft and rubbery when squeezed. These pods lack the slight crispness of perfectly ripe okra and can taste mild or watery. If you’ve missed the window, don’t despair!
Overripe okra can still be used—simmer it longer in soups or stews to break down the fibers. Just avoid eating it raw, as the seeds and texture can be unpleasant.
Another telltale sign is the pod’s surface texture. Ripe okra has a slightly fuzzy appearance, while overripe pods develop a rough, leathery feel. Even the stem end gives clues: a fresh cut reveals moist, white interior, while an old cut turns dry and brown.
I always inspect both ends before deciding whether to harvest.
If your okra plants are bolting (producing flowers) without pods, you’ve likely missed the harvest window. In this case, let a few pods mature fully for seeds, then pull the plant to make room for a fall replanting.
Pro tip: Prune lower leaves regularly to improve airflow and encourage more pods to form at the ideal size.
To salvage less-than-perfect okra, try blanching or pickling. Overripe pods work well in pickles because the vinegar softens the texture. For underripe okra, sauté it quickly with garlic and oil to enhance flavor.
With practice, you’ll train your eye to spot the sweet spot—where okra is tender, flavorful, and free of bitterness.